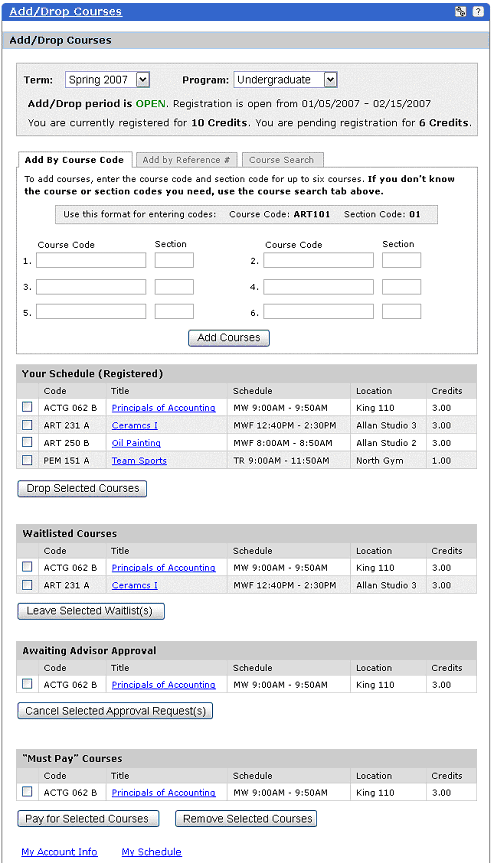
The Add/Drop Courses screen lets you directly register for courses and/or drop courses from your schedule:

At the top of the screen select the Term and Program for which you would like add (register) or drop classes. Also find here information about when Add/Drop and Registration periods are open, how many credits you are registered for, and how many credits you are waitlisted for.
From the Add By Course Code tab you can register for up to six courses by entering their Course codes and Sections. If your school does not use section numbers, you need to enter a "space" in the Section box.
If your JICS administrator has set up the Course Schedules portlet to make the Add by Reference # tab visible to you, you can click on it to register for up to six courses by entering their Reference Numbers:
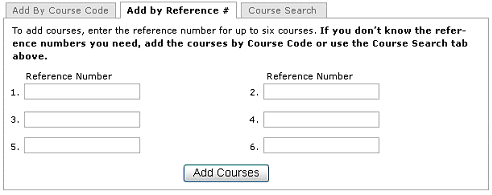
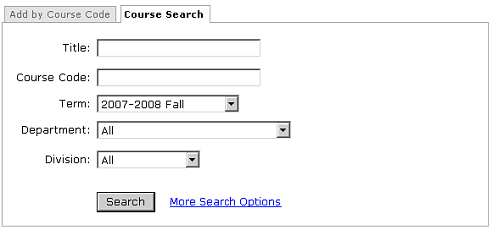
On both tabs, click the Add Courses button to register for the courses you've specified. If you do not know the Course Codes/Section or the Reference numbers of the courses you wish to add to your schedule, then click the Course Search tab to search for courses:
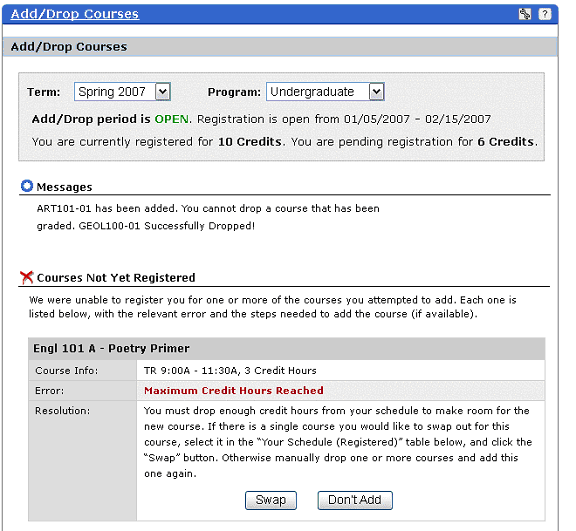
After you add or drop courses, you see confirmation "Messages" and/or "Courses Not Yet Registered" information. In the "Courses Not Yet Registered" section, you see Add/Drop Errors displayed in succession. In the example below only one Add/Drop error, "Maximum Credit Hours Reached", is displayed in the "Courses Not Yet Registered" section:
This section displays all of the registered classes that you are permitted to drop. Courses that you cannot drop for the selected term and program do not display here. To see your complete schedule, click the My Schedule hyperlink at the bottom of the Add/Drop screen.
This section displays information on Course Code, Title, Schedule, Location, and Credits for each registered course. To view Course Details, click on the course title hyperlink. To drop a course, select the check box next to the course and press the Drop Selected Courses button. View confirmation that you have successfully dropped a course in the Messages section.
This section displays all of the classes for which you are waitlisted. This section displays information on Course Code, Title, Schedule, Location, and Credits for each waitlisted course. To view Course Details, click on the course title hyperlink.
When an advisor grants a course authorization of NOSEATS to a waitlisted student for a particular course, the course displays a "Move to Current" link. The student or advisor can thenmove the course into the current course list.
To remove a course from the waitlist, select the check box next to the course and press the Leave Selected Waitlist(s) button. View confirmation that you have successfully removed this course from the waitlist in the Messages section.
This section displays all of the classes that require advisor approval before registration. To view Course Details, click on the course title hyperlink. Select the courses you wish to remove from this list and press the Cancel Selected Approval Request(s) button. View confirmation that you have successfully canceled your approval requests in the Messages section.
To pay "Must Pay" Courses, select the courses you wish to pay for and press the Pay for Selected Courses button to access the Pay on My Account screen. After payment on a course has been made, the course displays in the Your Schedule (Registered) section of the Add/Drop Courses screen. To view Course Details, click on the course title hyperlink. Select the courses you wish to remove from this list and press the Remove Selected Courses button. View confirmation that you have successfully removed the course from this list in the Messages section.
Links are provided on this screen to My Account Info and My Schedule.
One or more of the following errors displays in succession in the Courses Not Yet Registered section if a course cannot be added directly to your “Registered” list of courses:
Course is Full (no waitlist available)
This error displays when a course is full, if the option to manually add yourself to the waitlist is turned off by the JICS administrator, or the waitlist is otherwise unavailable:

If there are other sections of the course, you can attempt to add one that is not yet full by clicking on the Check for other sections link. Check for other sections sets the search term to the Course Code of the current course, performs the search, and displays a Search Results screen with the results. Otherwise, use the Course Search link to find a different course.
Click the OK button to remove this message.
If you are an Advisor performing the Add/Drop from the Advisee Roster portlet, you can click the Override Error button to add the course despite the error.
Course is Full (waitlist available)
This error displays for a course that is full, if the option to manually add yourself to the waitlist is turned on by the JICS administrator:

If there are other sections of the course, you can attempt to register for one that is not yet full by clicking on the Check for other sections link. Check for other sections sets the search term to the Course Code of the current course, performs the search, and displays a Search Results screen with the results.
Click the Join Waitlist button to add this course to the waitlist.
Click the Don't Add button to remove this course from the screen.
If you are an Advisor performing the Add/Drop from the Advisee Roster portlet, you can click the Override Error button to add the course despite the error.
This error displays for a course section that is already present in the user’s schedule:

Click the Ok button to remove this message.
This error displays for a “direct add” course code that does not match any courses:

Click the Course Search hyperlink to find the course you want.
Click the Ok button to remove this message.
This error displays when a “direct add” reference number does not match any courses:

If you are unable to add a course by reference number or course code, click the Course Search link to find the course you want to add.
Click the OK button to remove this error.
NOTE: Your JICS administrator needs to configure your access to the Add by Reference # tab. If you have permission to use it, it appears between the Add by Course Code and Course Search tabs.
Can't Add (missing prerequisite, etc.)
This error displays for a course that you cannot register for because you are missing a prerequisite for the course:

Click the Course Search hyperlink to search for a different course.
Click the Ok button to remove this message.
If you are an Advisor performing the Add/Drop from the Advisee Roster portlet, you can click the Override Error button to add the course despite the error.
Corequisite Course(s) Required
This error displays for a course that cannot be added until its corequisite courses have been added:

Click the View Requirements button to display the Add Corequisite Courses screen.
Click the Don't Add button to remove this error.
If you are an Advisor performing the Add/Drop from the Advisee Roster portlet, you can click the Override Error button to add the course despite the error.
This error displays for a course that cannot be added until its concurrent courses have been added.
Click the View Requirements button to display the Add Corequisite Courses screen.
Click the Don't Add button to remove this error.
If you are an Advisor performing the Add/Drop from the Advisee Roster portlet, you can click the Override Error button to add the course despite the error.
This error displays when the student has attempted to add more credit hours than they are allowed:
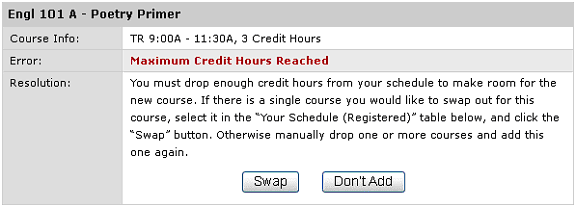
Select the course from the "Your Schedule (Registered)" table that you wish to swap out for this one. Then click the Swap button.
Click the Don't Add button to remove this message.
Schedule Conflict, Single Course Conflict
This error displays for a course that has a schedule conflict with one or more currently registered courses:

Click the Swap button to drop the course with the conflict and add a new course.
Click the Don't Add button to cancel any action and remove the new course.
If you are an Advisor performing the Add/Drop from the Advisee Roster portlet, you can click the Override Error button to add the course despite the error.
Schedule Conflict, Multiple Course Conflict
This error displays for a course that has a schedule conflict with more than one currently registered course:

Click the Swap button to drop the course with the conflict and add a new course.
Click the Don't Add button to cancel any action and remove the new course.
If you are an Advisor performing the Add/Drop from the Advisee Roster portlet, you can click the Override Error button to add the course despite the error.
This error displays for a course that has a non-academic or section requirement:

Contact your registrar's office for more information about this section requirement. Or click the Course Search hyperlink to search for a different course.
Click the Ok button to remove this message.
If you are an Advisor performing the Add/Drop from the Advisee Roster portlet, you can click the Override Error button to add the course despite the error.
This error displays when the course code matches more than one course:

Click the Course Search hyperlink to select the course and section you wish to register for.
Click the Ok button to remove this message.
This error displays when the course has variable credit hours:
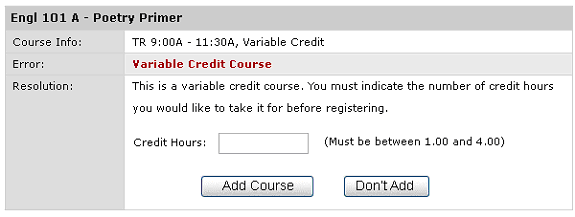
You must enter the number of credit hours that you wish to register for.
Then click the Add Course button to add the course with the credit hours entered.
Click the Don't Add button to cancel the action and remove the course.
Click on the Admin this portlet link at the top of the Course Schedules portlet to configure all of the settings for the Add/Drop functionality.